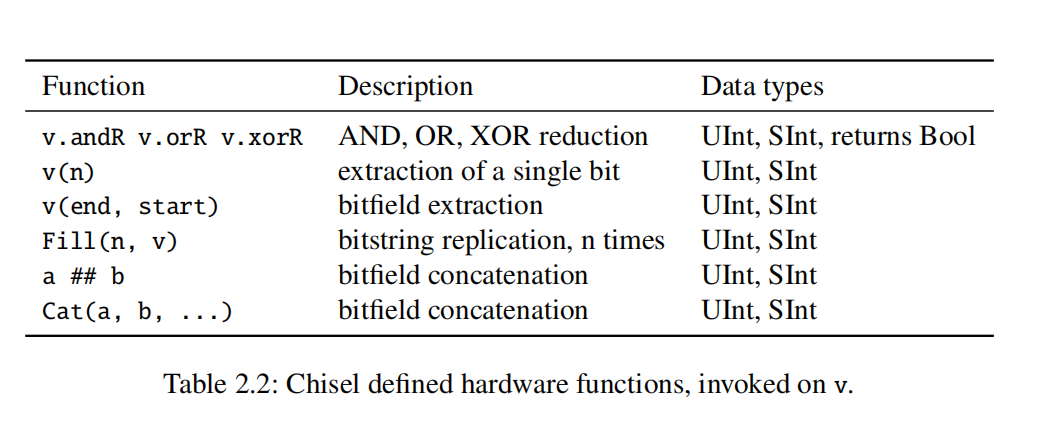
val and = a & b // bitwise and val or = a | b // bitwise or val xor = a ˆ b // bitwise xor val not = ˜a // bitwise negation The arithmetic operations use the standard operators: val add = a + b // addition val sub = a - b // subtraction val neg = -a // negate val mul = a * b // multiplication
import org. scalatest ._ import org. scalatest .flatspec. AnyFlatSpec import org. scalatest .matchers.should. Matchers classExampleTestextendsAnyFlatSpecwithMatchers{ "Integers" should "add" in { val i = 2 val j = 3 i + j should be (5) } "Integers" should "multiply" in { val a = 3 val b = 4 a * b should be (12) } }
classDeviceUnderTestextendsModule{ val io = IO(newBundle { val a = Input(UInt (2.W)) val b = Input(UInt (2.W)) val out = Output(UInt (2.W)) }) io.out := io.a & io.b }
classSimpleTestextendsAnyFlatSpecwithChiselScalatestTester { "DUT" should "pass" in { test(newDeviceUnderTest ) { dut => dut.io.a.poke (0.U) dut.io.b.poke (1.U) dut.clock.step () println("Result is: " + dut.io.out.peek ().toString) dut.io.a.poke (3.U) dut.io.b.poke (2.U) dut.clock.step () println("Result is: " + dut.io.out.peek ().toString) } } }
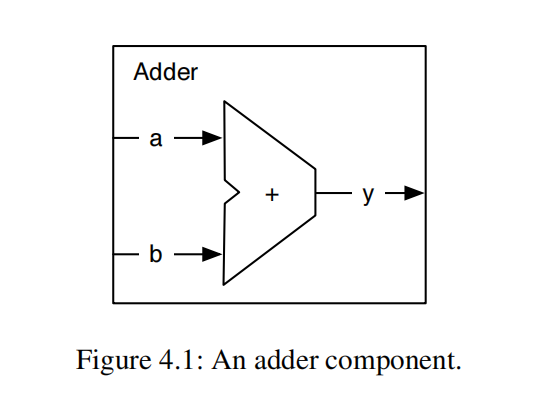
classAdderextendsModule{ val io = IO(newBundle { val a = Input(UInt (8.W)) val b = Input(UInt (8.W)) val y = Output(UInt (8.W)) }) io.y := io.a + io.b }
1
2
3
4
5
6
7
8
9
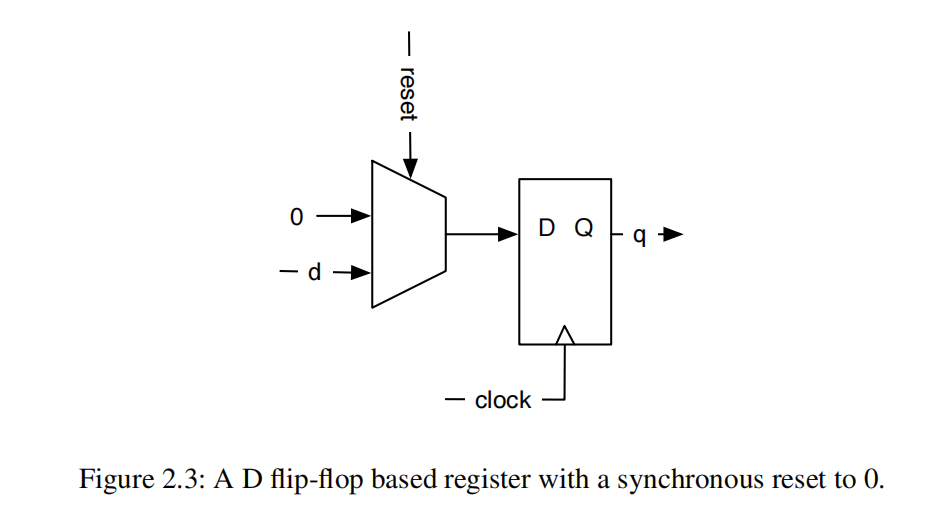
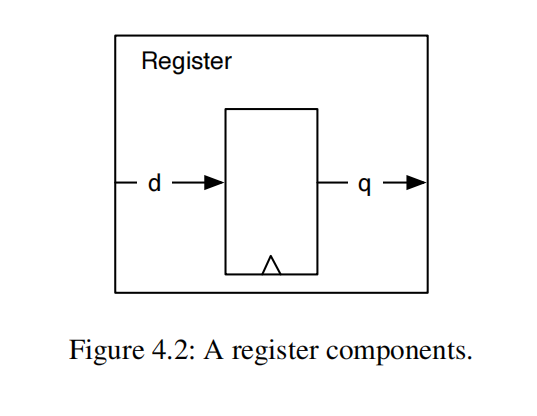
classRegisterextendsModule{ val io = IO(newBundle { val d = Input(UInt (8.W)) val q = Output(UInt (8.W)) }) val reg = RegInit (0.U) reg := io.d io.q := reg }
1 2 3 4 5 6 7 8 9 10 11 12 13 14 15
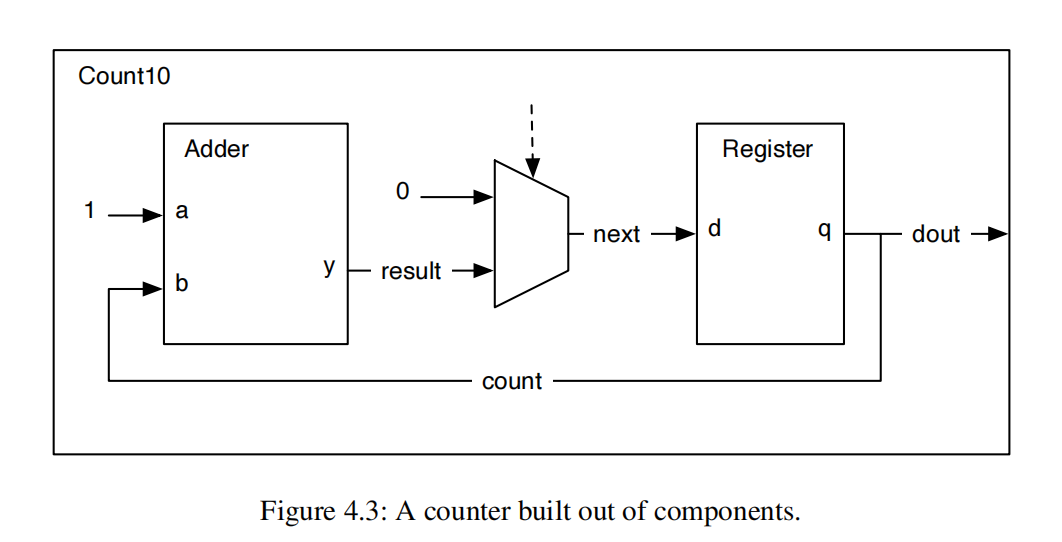
classCount10extendsModule{ val io = IO(newBundle { val dout = Output(UInt (8.W)) }) val add = Module(newAdder ()) val reg = Module(newRegister ()) val count = reg.io.q // connect the adder add.io.a := 1.U add.io.b := count val result = add.io.y val next = Mux(count === 9.U, 0.U, result) reg.io.d := next io.dout := count }
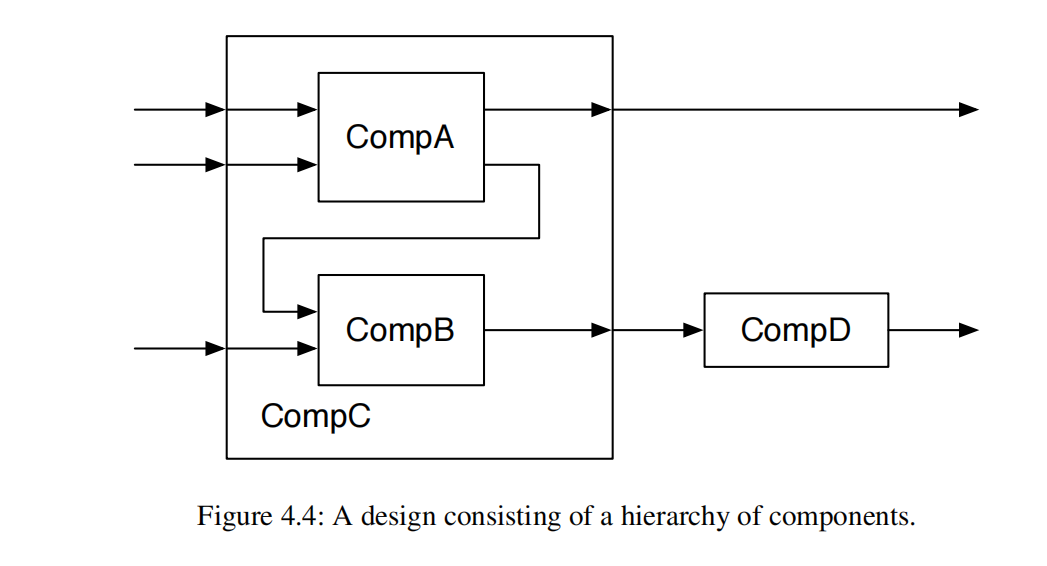
classCompAextendsModule{ val io = IO(newBundle { val a = Input(UInt (8.W)) val b = Input(UInt (8.W)) val x = Output(UInt (8.W)) val y = Output(UInt (8.W)) }) // function of A } classCompBextendsModule{ val io = IO(newBundle { val in1 = Input(UInt (8.W)) val in2 = Input(UInt (8.W)) val out = Output(UInt (8.W)) }) // function of B } classCompCextendsModule{ val io = IO(newBundle { val in_a = Input(UInt (8.W)) val in_b = Input(UInt (8.W)) val in_c = Input(UInt (8.W)) val out_x = Output(UInt (8.W)) val out_y = Output(UInt (8.W)) }) // create components A and B val compA = Module(newCompA ()) val compB = Module(newCompB ()) // connect A compA.io.a := io.in_a compA.io.b := io.in_b io.out_x := compA.io.x // connect B compB.io.in1 := compA.io.y compB.io.in2 := io.in_c io.out_y := compB.io.out }
classFetchextendsModule{ val io = IO(newBundle { val instr = Output(UInt (32.W)) val pc = Output(UInt (32.W)) }) // ... Implementation of fetch } // The next stage is the decode stage. classDecodeextendsModule{ val io = IO(newBundle { val instr = Input(UInt (32.W)) val pc = Input(UInt (32.W)) val aluOp = Output(UInt (5.W)) val regA = Output(UInt (32.W)) val regB = Output(UInt (32.W)) }) // ... Implementation of decode } // The final stage of our simple processor is the execute stage. classExecuteextendsModule{ val io = IO(newBundle { val aluOp = Input(UInt (5.W)) val regA = Input(UInt (32.W)) val regB = Input(UInt (32.W)) val result = Output(UInt (32.W)) }) // ... Implementation of execute }
val fetch = Module(newFetch ()) val decode = Module(newDecode ()) val execute = Module(newExecute) fetch.io <> decode.io decode.io <> execute.io io <> execute.io